Showing posts with label how to. Show all posts
50% Select Sales @ LOFT: Restock On Basics
DIY Nude Blingy Manicure With OPI, Martha Stewart Glitter and Gelish
1. Give yourself or get a standard manicure.
2. Paint nails with 1 coat of your desired nail color. Here, I used OPI Did You 'Ear Me Van Gogh.
3. Right after your 2nd coat of nail polish (on each nail), dip or apply with a sponge the silver Martha Stewart Leaf Glitter.
4. Use a wood stick to press the edges of the foil down. They have a tendency to flip up, which will be a cause for annoyance later.
5. Then sprinkle the silver glitter, emphasizing most of your coverage on the tips.
6. Use blowdryer to dry and blow away loose glitter.
7. Apply 2 coats of your favorite top coat. I used Gelish Top It Off with a UV Lamp for my top coat.
I'm on day 4 and the manicure is still going strong. I utilize Gelish top coat all the time with regular nail polish. The trick is to ensure the polish is completely dry. If you can, let it dry overnight. If Gelish is applied to paint that isn't dry, you will find a soft ripply texture, as opposed to the hardened high shine finish.
Email me if you have any questions and please "Pin This" to share the love.
Ombré Glitter Bling Gelish Manicure
I put my "professional" work nails away and gave myself the wildest holiday manicure ever. I am loooooving my new Gelish goodies purchased from Amazon. Since trying Sephora nail glitter, I thought, why couldn't I use craft glitter? So I headed to my local art supply shop and grabbed this monster pack of Martha Stewart glitter for $15 (after 20% sale).
Inspired by this JCrew Sequin skirt (here and here) I attempted the very trendy ombre look and here is the result!
I was so concentrated on this manicure project, I regret not taking in-process photos. I will list step by step instructions below, but trust that next time I do this I will take in-process photos to share.
First DIY Gelish Manicure (Shellac type polish)
After my Blingy Chanel Manicure, I was on the search for a Shellac or Gel Polish option that would last longer than 3-4 days. I know my local nail salon charges at least $30 for a gel polish manicure without any glitter or additional designs. Thanks to the ladies of TPF Nail Care forum, I was able to find all the supplies needed to try doing this at home.
My total order was less than $80, which will pay for itself after 2-3 DIY manicures.
Here are the supplies I purchased from Amazon:
Note: I follow these steps one (1) hand at a time- rather than alternating between hands. I find working on one (1) hand all the way through the process avoids many clumsy goof-ups.
First: Trim, File and prep your nails to remove any cuticles that may be growing on the nail bed. With rubbing alcohol, remove any excess oils/moisturizers from your nails.
Second: Apply 1 coat of Foundation Base Gel- cure for 1 min.
I wear rubber gloves with the tips cut off to avoid any pre-mature aging
Third: Apply a thin coat of gel nail color of choice. Cure for 2 mins- repeat for a 2nd coat. I used Gelish Pink Smoothie this time. If the color seems uneven, don't worry too much, the curing process will level out the color.
Fourth: After curing your last color coat, use an old lip brush to apply desired glitter to the tips or in any pattern you like.
Note: I used Sephora Nail Glitter, but any arts & crafts glitter will do. In fact, visiting a stationary/ scrap booking store will give you many glitter color options.
Here's a picture of right hand application of glitter (a bit harder to capture):
Fifth: Apply two (coats) of top coat and cure each for 2 minutes.
Note: the glitter will shift around during top coat application.
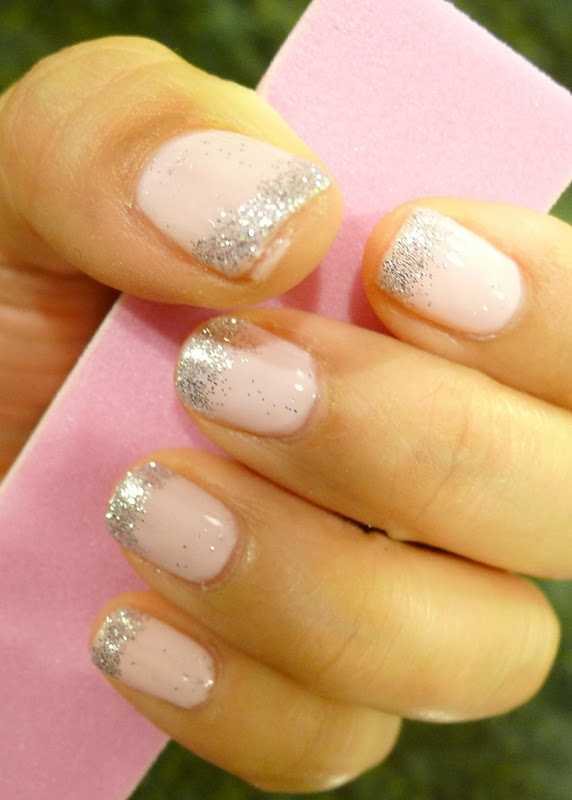
Here is the finished look.
Since completing my first DIY Gelish Manicure, I've purchased more colors and look forward to sharing more manicure ideas with you!
Here's my Holiday Nail Project if you'd like to see another glitter concept.
Blingy Chanel 527 Self Manicure
I am obsessed with this blog, by Bisou Lounge in Oakland. They've done an amazing job on my nails before, but I'm afraid I can't be a regular customer because of other "maintenance" things I have going on.
I tried doing an "at home" version of a Tiffany box inspired look. As I type, my self-manicaure is on Day 3 and holding up very well :)
So much so, I decided to buy Gelish soak off gel polish with the UV lamp from Amazon to keep up my at home manicures and save some moolah.
If you need some help with either Gelish or Shellac suggestions, the ladies over at TPF Nailcare forum have been amazing!
Above are the tools I used (not picture: 100% acetone). I use the brush dipped in acetone to shape the blue tips. Seche Vite is also the BEST and ONLY top coat I ever use...believe me.
Brooch Storage
Here's a picture of how I store my brooch collection.
I hang a 2" (width) satin ribbon on the slats of my closet doors. Then I pin or clip them to the ribbon- simple as that! Because the brooches are hanging near my clothes, I can quickly pick one out to wear for the day.
Do you have a creative way of storing accessories? Jewelry, tights, scarves, etc? I would love to hear your ideas!
Subscribe to:
Comments (Atom)


